router 路由
前端页面的路由通过 hash 模式实现,每次跳转并不是切换页面,而是在同一个页面内进行跳转,也称为 spa 页面
javascript
let router = new VueRouter({
 // 匹配规则
  routes:[
       {
          path:'',
          component:()=>import('') // 使用懒加载载入页面,
          meta:{}, //此路由的一些信息
          redirect: '',// 路由重定向,填路由的path进行替换,如要默认显示子路由加父路由页面的话,这里填完整的路由path(父路由path+子路由path)
          // 也可以写成一个方法
          redirect: to => {
              // to 是当前路由对象
              // return 重定向的字符串路径/路径对象
              return { path: '/search', query: { q: to.params.searchText } }
           },
          name: '', // 路由的命名
          children:[
                  // 子路由,相当于一个routes,使用子路由需要在父路由页面放置一个router-view的路由坑
                { path: '',
                // 所用的组件
                 components:''
            } ]
        },
        {
          path: '/search',
        },
      ],
    mode: 'history' // 启动history模式,页面url中不会出现#号
    linkActiveClass: '' // 路由高亮时的样式,这里指的是<router-link></router-link>的样式

})

// to表明要去哪个路由,tag是将此标签装饰为别的标签,replace则是取消回退,即没有保留浏览记录
<router-link to=""  tag ="" replace></router-link>
命名视图
有时候想同时 (同级) 展示多个视图,而不是嵌套展示,例如创建一个布局,有 sidebar (侧导航) 和 main (主内容) 两个视图,这个时候命名视图就派上用场了。你可以在界面中拥有多个单独命名的视图,而不是只有一个单独的出口。如果 router-view 没有设置名字,那么默认为 default
javascript
<router-view class="view left-sidebar" name="LeftSidebar"></router-view>
<router-view class="view main-content"></router-view>
<router-view class="view right-sidebar" name="RightSidebar"></router-view>
// vue2用new VueRouter vue3用 createRouter
const router = createRouter({
  history: createWebHashHistory(),
  routes: [
    {
      path: '/',
      components: {
        default: Home,
        // LeftSidebar: LeftSidebar 的缩写
        LeftSidebar,
        // 它们与 `<router-view>` 上的 `name` 属性匹配
        RightSidebar,
      },
    },
  ],
})
别名
javascript
const routes = [
  {
    path: '/users',
    component: UsersLayout,
    children: [
      // 为这 3 个 URL 呈现 UserList
      // - /users
      // - /users/list
      // - /people
      { path: '', component: UserList, alias: ['/people', 'list'] },
    ],
  },
]

// 如果路由中有参数 那么也需要在别名中增加
const routes = [
  {
    path: '/users/:id',
    component: UsersByIdLayout,
    children: [
      // 为这 3 个 URL 呈现 UserDetails
      // - /users/24
      // - /users/24/profile
      // - /24
      { path: 'profile', component: UserDetails, alias: ['/:id', ''] },
    ],
  },
]
动态路由
javascript
// query传参
<router-link to='test?id=10'></router-link>
// 调用(在路由跳转后的页面调用) this.$route.query  得到是一个对象{id:10}

// params传参
<router-link to='test/10'></router-link>
// 对应的路由表中path改写{path:'test/:id'}
this.$route.params //得到一个对象 {id:10}

// 利用$router的主动式路由跳转及传参
// query传参,与params传参的不同之处在于,query会将传递的参数展示在浏览器的url路径上,而params不会。相当于query是get请求,而params是post请求
this.$router.push("/test?id=222");
this.$router.push({path:"/test",query:{id:222}}) //注意,对象写法的query传参,必须是path和query的搭配
// 以上两种都是query传参,在跳转后的页面通过this.$route.query都可以拿到一个对象,{id:222}

// params传参
this.$router.push({name:"testName",params:{id:333}}) //注意,对象写法的params传参,必须是name和params的搭配
// 在跳转后的页面通过this.$route.params都可以拿到一个对象,{id:333}
路由对象和路由参数对象
javascript
// 路由对象
$router  // 可操作路由的走向 this.$router.push({path:''}),也可以用 this.$router.push({name:'',params:{}})进行跳转
this.$router.push() //可操作路由的走向

// 在浏览器记录中前进一步,等同于 history.forward()
this.$router.go(1)
// 后退一步记录,等同于 history.back()
this.$router.go(-1)

// repalce,效果和push相同,也是跳转路由,但是这种不会留下浏览记录,即无法回撤
this.$router.replace();

// 路由参数对象
$route  // 可以拿到路由中的信息 this.$rote.fullPath拿到路由路径的全部,this.$rote.meta拿到路由route的信息


// vue3中通过useRouter useRoute拿取对应的路由
// 在模版中依旧可以使用$router 和 $route
<tempalte> <div @click='$router.push('')'>{{$route.query}} </div></tempalte>
<script setup>
  import { useRouter, useRoute } from 'vue-router'
  const router = useRouter()
  const route = useRoute()
  function pushWithQuery(query) {
      router.push({
        name: 'search',
        query: {
          ...route.query,
          ...query,
        },
      })
    }
</script>
路由组件传参
javascript
// 将props设置为true的时候,跳转到对应的路由的时候可以将路由上的query或者params上的参数作为props传入组件中
const routes = [{ path: '/user/:id', component: User, props: true }]
// 也可以写成一个对象
const routes = [
  {
    path: '/promotion/from-newsletter',
    component: Promotion,
    props: { newsletterPopup: false }
  }
]
// 还可以是一个函数
const routes = [
  {
    path: '/search',
    component: SearchUser,
    props: route => ({ query: route.query.q })
  }
]

// 访问/user/9 路由
<tempalte><div>{{id}}</div></tempalte>
<script>
  export defalut {
     props: ['id'],
  }
</script>

// 如果用了命名视图,需要对每一个视图配置props
const routes = [
  {
    path: '/user/:id',
    components: { default: User, sidebar: Sidebar },
    props: { default: true, sidebar: false }
  }
]
路由内的各个钩子
javascript
// 全局路由守卫(写在router实例化的文件中)
// 注意全局路由守卫,在每次路由发生改变后,就会被触发
// 跳转前:
router.beforeEach((to,from,next) => {
        to //要跳转的路由对象即route
        from //跳转前的路由对象
        next() //一定要写这个,要不然无法进行跳转,也可以在next(‘’)写路由的path来改变路由的跳转,
})
// 跳转后:
router.afterEach((to,from,next) => {

})
// 全局路由解析守卫:
router.beforResolve((to,from,next) => {
    //效果和beforeEach相同,但是执行的顺序不同
})


// 路由独享守卫(当此路由发生了改变才会触发)
{path:‘’ ,component:‘’ ,beforeEnter((to,from,next)=>{

})}

// 组件独享守卫(写在组件的vue文件中):
//test组件中
export default {
//进入该组件之前触发
beforeRouteEnter: function(to, from, next) {
    //这里无法通过this拿到vue实例,只能通过在next方法中的回调拿到vue实例,注意只有这个钩子有回调函数
    next(vm=>{
        vm //vm就是vue实例
    })
  }

 // 在当前路由改变,但是该组件被复用时调用
 // 举例来说,对于一个带有动态参数的路径 /test/:id,在 /test/1 和 /test/2 之间跳转的时候,
 // 由于会渲染同样的 test 组件,因此组件实例会被复用。而这个钩子就会在这个情况下被调用。
beforeRouteUpdate: function(to, from, next) {

    //这里的this代表的是vue实例
    this
  }

//离开组件后之前触发
beforeRouteLeave: function(to, from, next) {
    //这里的this代表的是vue实例
     this
  }
}
路由解析的整个过程
INFO
- 导航解析开始
- 触发上一个组件的
beforeRouterLeave方法 - 进入全局,触发全局的
beforeEach方法 - 判断是否是动态路由,触发组件内部的
beforeRouterUpdate方法 - 进入路由,触发路由配置上的
beforeEnter方法 - 解析异步加载的组件
- 触发将要进入组件的
beforeRouterEnter方法 - 回到全局触发
beforeResolve方法 - 导航确认完毕
- 触发全局的
afterEach方法 - 渲染 Dom
- 触发将要进入组件的
beforeRouterEnter方法中 next 方法的回调函数,创建好的组件实例会作为回调函数的参数传入。
RouterView 插槽(4.x 版本可以使用)
javascript
// 这样就可以保证是路由组件的活跃 而不是router-view的活跃
<router-view v-slot="{ Component }">
<keep-alive>
<component :is="Component" />
</keep-alive>
</router-view>
// 可以用在过度效果上
<router-view v-slot="{ Component }">
<transition>
<keep-alive>
<component :is="Component" />
</keep-alive>
</transition>
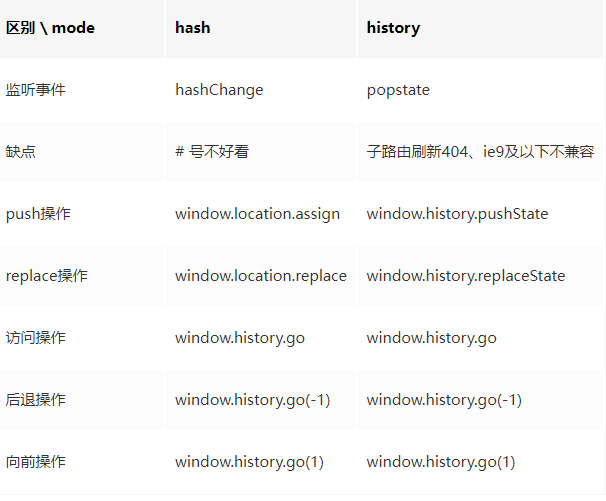
</router-view>路由 history 模式和 hash 模式的特点
INFO
hash模式就是 url 路径的#后面的部分,虽然在 url 路径中,但是并不会附加进 http 请求中,不会影响服务端的操作,即便修改了 hash 的内容,页面也不会重新渲染。同时可以对 hash 加上监听事件。兼容性好,但是不美观 history模式的实现主要是利用 pushState 和 replaceState 方法来修改浏览器会话的历史记录栈,虽然改变 url 路径,但是页面不是重新渲染。虽然美观但是刷新页面会出现 404,需要后端配合配置
router 异步引用组件的方式
INFO
- vue 异步组件
- ES6 的 import 方法
- webpack 的 require.ensure 方法
javascript
//vue异步组件
export default new Router({
  routes: [
    {
      path: '/home',',
      component: (resolve) => require(['@/components/home'], resolve),
    },
    {
      path: '/about',',
      component: (resolve) => require(['@/components/about'], resolve),
    },
  ],
})

//ES6的import方法
export default new Router({
  routes: [
    {
      path: '/home',',
      component: () => import('@/components/home'),
    },
    {
      path: '/about',',
      component: () =>import('@/components/about'),
    },
  ],
})

//webpack中require.ensure方法
export default new Router({
  routes: [
    {
      path: '/home',
      component: () => require.ensure([],'@/components/home', 'home'), //第三个参数为chunk名
    },
    {
      path: '/about',
      component: () => require.ensure([],'@/components/about', 'about'),
    },
  ],
})
router 的异步加载组件,可以达到按需加载模块,优化项目性能的目的,同时可以和 webpack 配合起来,按照路由维度的不同划分成不同的 chunk 代码块(即合成一个单独的 js 文件),同时利用浏览器缓存策略,缓存这些 chunk 代码块